Disclosure: This post may contain affiliate links. I may earn a small commission for my endorsement, recommendation, testimonial, and/or link to any products or services from this website.
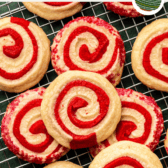
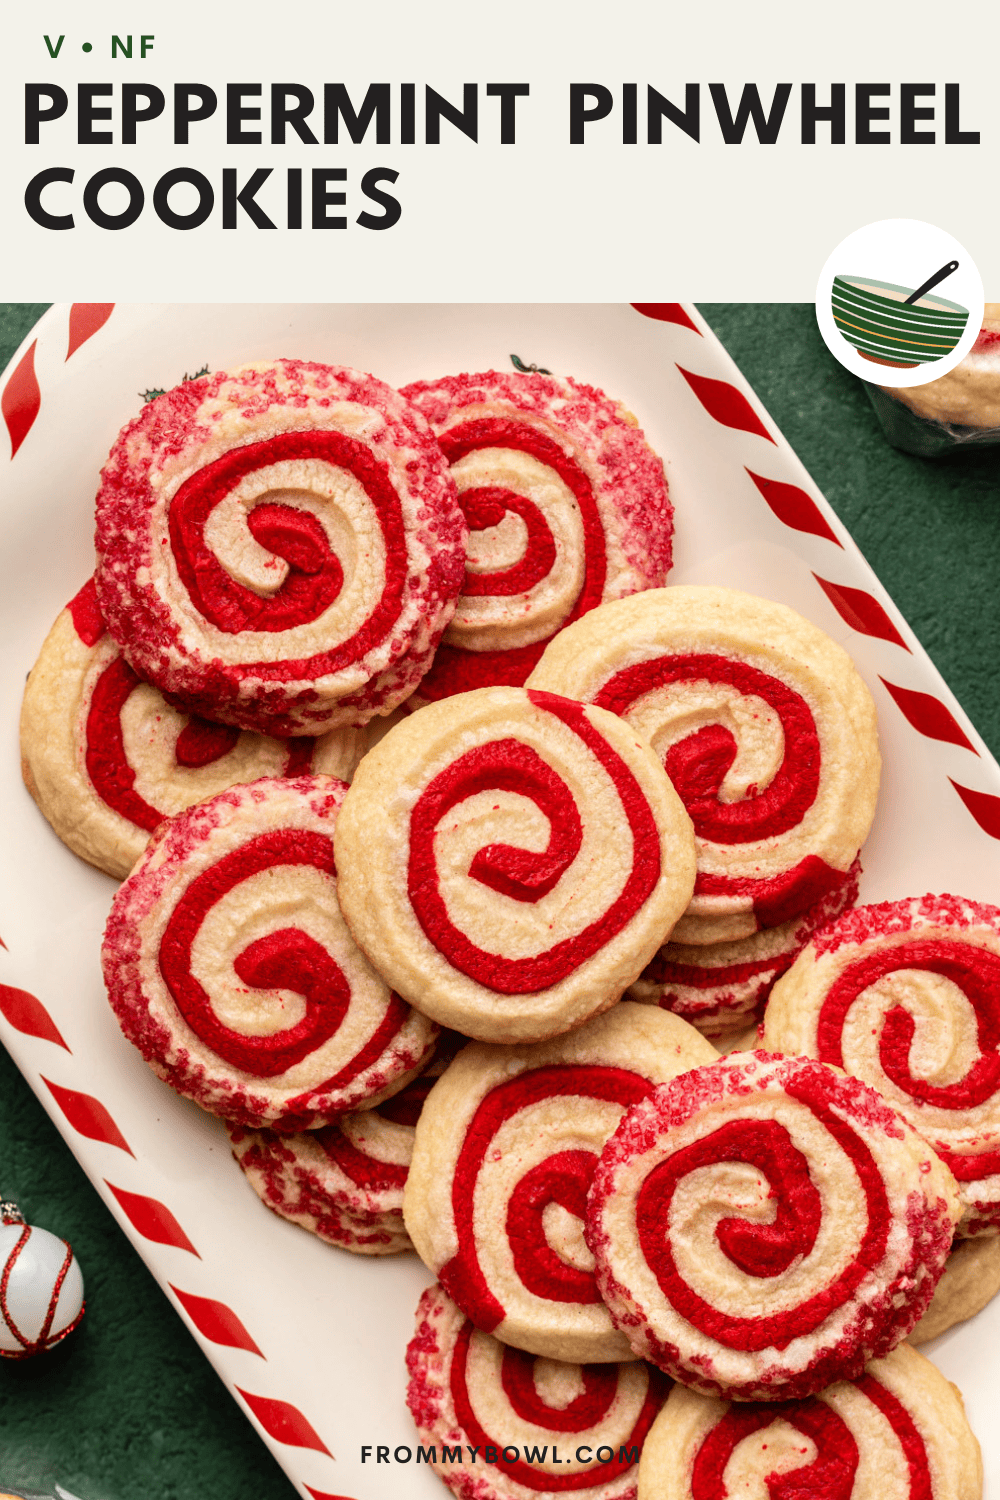
From their decadent red swirls to their peppermint flavors, these slice-and-bake Vegan Peppermint Pinwheel Cookies are an irresistible addition to your holiday baking list.
These Peppermint Pinwheel Cookies are just what you need to celebrate the holidays! Layers of red and white shortbread cookie dough are rolled together to create irresistible festive swirls you and your party guests will love. They’re easier to make than they look and require less than 10 baking staples!
Table of Contents
What Are Pinwheel Cookies?
These infamous Christmas cookies roll two different colored sheets of shortbread-style dough together to create a mesmerizing spiral in the middle. These soft and buttery cookies may look complicated, but they come together fairly easily! All you need are a handful of baking staples and a little patience to make your own batch.
Instead of the classic chocolate and vanilla cookie dough, I opted for layers of bright red and white vanilla and peppermint-flavored dough to make these Peppermint Pinwheel Cookies extra festive. Just look at those white and red swirls… They’re practically hypnotizing! Suddenly I feel like I have to add a double batch to my Christmas baking list.
What You Need for Vegan Pinwheel Cookies
There are no funky ingredients or egg replacers here! Christmas pinwheel cookies are made from nothing but 7 baking staples, plus a couple of extra ingredients that lend a festive color and flavor:
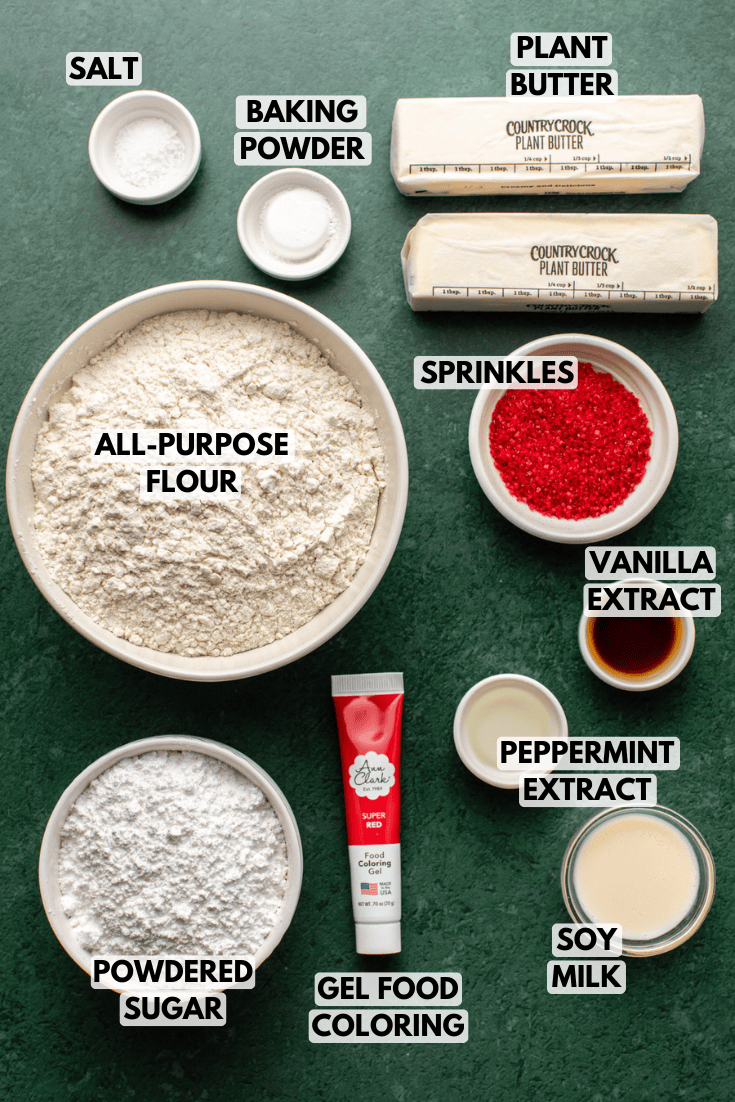
- Flour: all-purpose flour keeps this recipe super simple.
- Butter: use softened unsalted butter. You need a good amount of butter here (1 cup), so opt for a quality brand of baking sticks for the best results and easy measuring.
- Powdered Sugar: classic shortbread cookies are made with lots of butter and sweetened with powdered sugar to give them their characteristic melt-in-your-mouth texture.
- Peppermint Extract: for that candy cane flavor. A little goes a long way!
- Red Gel Food Dye: use gel, not liquid food dye. Gel food coloring is more concentrated, and just a bit gives these cookies a bright red color without any additional liquid.
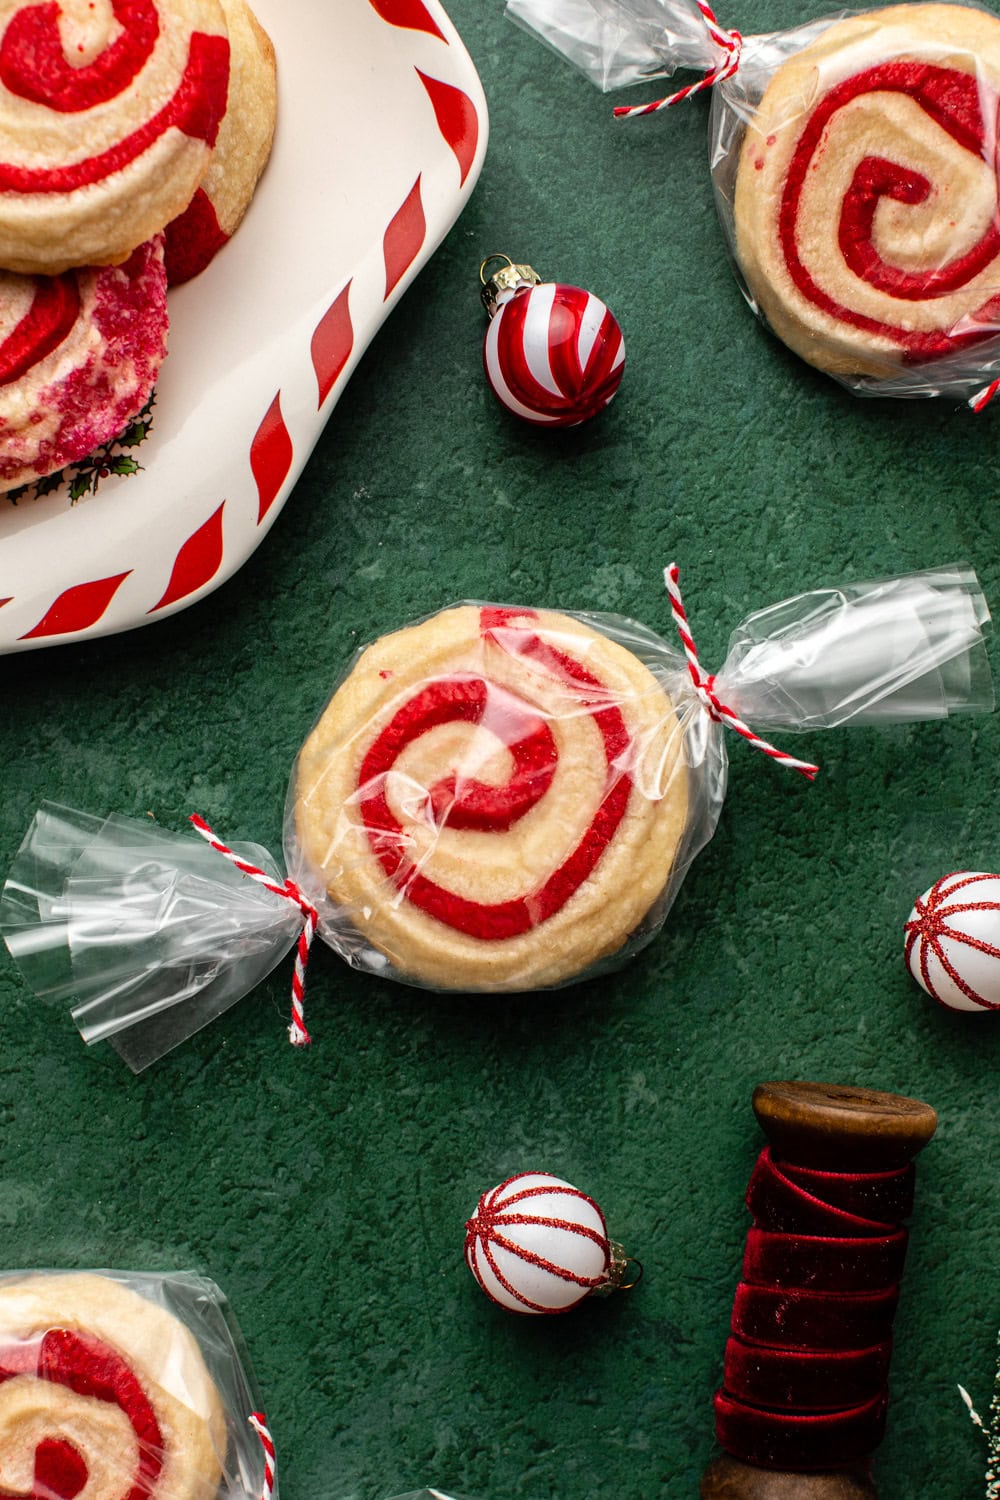
- Sprinkles: optional, but so festive! I like dunking the edges of my spiral cookies in clear crystal red sprinkles for a glittery presentation.
How to Make Peppermint Pinwheel Cookies
- Cream the softened butter until it’s light and smooth. Beat in the powdered sugar, baking powder, and salt until combined, then the milk, vanilla, and peppermint. Finally, mix in the flour until just combined.
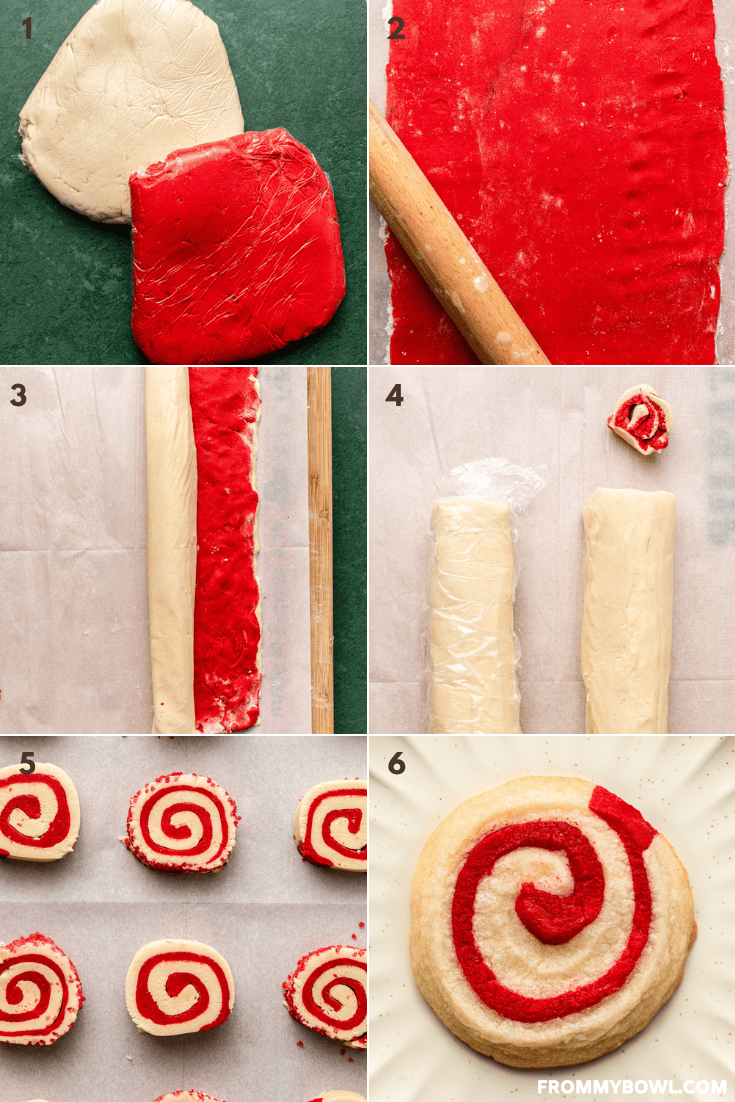
- Set 2/3 of the dough aside (for the white portion) and add the red food coloring to the remaining 1/3 of the dough. Beat until the dye is incorporated and the dough is bright red.
- Wrap the white and red dough separately in plastic wrap, flatten both into discs, and refrigerate.
- Roll the white dough into an 8×13” rectangle. Transfer the dough to a baking sheet and refrigerate. Next, roll the red dough into an 8×12.5″ rectangle.
- Return the white dough to your workstation. Flip the red dough on top of the white dough and carefully line up the edges. Gently roll the dough once more to remove any air bubbles.
- Roll the dough into a log shape. Cut the log in half and roll one or both of them in the sprinkles.
- Wrap the logs in plastic and freeze.
- Unwrap the dough, cut each log into 12 cookies, and lay them on a baking sheet.
- Bake the cookies until the bottom edges are just starting to turn golden. Set them aside to cool before serving or storing them for later.
Caitlin’s Cooking Tips
- For cookie dough that doesn’t stick to the counter, roll the dough on a lightly floured sheet of parchment paper on top of a silicone baking mat or cutting board. The parchment paper acts sort of like a sushi mat, making it easy to pick up and roll the dough as needed.
- Patience = perfection: From taking the time to chill the dough to carefully realigning the edges to achieve an eye-catching swirl, pinwheel cookies require a good amount of patience. But trust me, the time and effort are sooo worth it.
- Cutting perfect circles: Rotate and gently reroll the dough logs every 15 minutes or so while they’re in the freezer, as the bottom side will slightly flatten when left alone. Also, slice the cookies with your sharpest knife as soon as they come out of the freezer.
Serving Suggestions
I personally adore these peppermint cookies with a vegan peppermint mocha on the side. The more peppermint, the better! They’re also wonderful with coffee, tea, or a chilled glass of non-dairy milk.
Make sure you save extras to serve at the holiday party! Their gorgeous red swirls will mesmerize your party guests and have them reaching for cookies all night.
If you’re looking for more vegan Christmas cookies, you’ll also love these Perfect Vegan Gingerbread Cookies, these Chocolate Chai Shortbread Cookies, and these Brown Butter Maple Cookies!
How to Store Leftover Pinwheel Cookies
Leftover pinwheel cookies will keep for up to 5 days in an airtight container at room temperature.
The baked cookies also freeze well for up to 2 months. When ready to eat, allow the cookies to thaw on the kitchen counter for about 1 hour or until they’re soft again.
To make the cookie dough logs in advance, follow the recipe through step 10 and store the wrapped logs in the fridge instead of the freezer for up to 3 days. Proceed with step 12 of the recipe before baking.
Keep in mind that the cookie dough logs will flatten on the bottom when they’re stored in the fridge. You can maintain their round shape by gently rolling the logs once more before cutting and baking the cookies.

Substitutions and Variations
- Unsalted Butter Substitute: Use an equal amount of salted butter instead but omit the kosher salt from the recipe.
- Sprinkle Substitute: Swap the red sprinkles for finely crushed candy canes for more peppermint flavor.
- Drizzle with Melted Chocolate: Another fun way to decorate your baked and cooled pinwheel cookies is to dunk or drizzle them with melted dark chocolate or vegan white chocolate.
Recipe FAQs
You can use your fingers to smooth out any cracks or pop the dough back in the fridge for about 10 minutes to help it firm up.
Separated layers or gaps are caused by air pockets. Make sure you’re rolling and re-rolling the dough rectangles and logs a few times to really press those two layers together. If you notice the cut cookies are separating, press them back together with your fingers before baking.
Chilling the dough is required. Skipping this step will not only make it difficult to roll out the dough without it sticking but will also cause the cookies to spread in the oven.
I have only tested these pinwheel cookies with regular all-purpose flour and unfortunately can’t guarantee that a gluten-free flour blend would work.
Enjoy! If you make this recipe and decide to share it on Facebook or Instagram, don’t forget to tag me @FromMyBowl + #FromMyBowl! I would also love it if you could leave a comment below with a recipe rating! Thank you for the support 😊
Peppermint Pinwheel Cookies
Ingredients
- 1 cup 2 sticks unsalted butter, softened
- 1 1/2 cup powdered sugar
- 1 teaspoon baking powder
- 1/2 teaspoon kosher salt* omit if using salted butter
- 1 tablespoon soy milk or another dairy-free milk
- 1 teaspoon vanilla extract
- 1 teaspoon peppermint extract
- 2 1/4 270 g cups all-purpose flour spooned and leveled
- Extra flour for dusting
- Red gel food coloring
- 1/4-1/2 cup sprinkles optional, for rolling the dough
Additional Tools:
- Hand mixer or stand mixer
- Plastic wrap
- Parchment Paper
- Rolling pin
- Ruler or measuring tape
Instructions
- Cream the butter: Add the softened butter to a large bowl and beat with a hand mixer or stand mixer on low speed until light and smooth, 2 to 3 minutes.
- Wet Ingredients: Add the powdered sugar, baking powder and salt; beat until combined, about 1 minute. Finally, add the milk, vanilla, and peppermint. Beat again until combined.
- Dry Ingredients: Add the flour to the bowl and beat one final time on low speed, until just combined.
- Divide: Use a spatula to smooth out the dough evenly across the bottom of the bowl and divide it into thirds – it doesn’t need to be perfect! Remove roughly 2/3 of the dough and set it aside to be the white portion of the dough. Add red food coloring to the remaining 1/3 of the dough (I used about 1/2 teaspoon) and beat on low speed until the dye is evenly distributed. You can also wear gloves and knead the dye in by hand, or mix with a spatula.
- Chill: Wrap the un-dyed dough in plastic wrap and flatten into a disc. Repeat with the red dough. Refrigerate the dough for at least 2 hours, or place in the freezer for 45 minutes, until more firm.
- Roll the White Dough: Place a sheet of parchment paper on a cutting board or work surface and generously dust it and your rolling pin with flour. Place the white disc of dough onto the parchment paper and sprinkle with more flour. Roll the dough out until it forms an 8×13 rectangle; try to be as precise as possible. If the dough is too long in a certain area, you can cut it off with a knife and re-add it to the rectangle using your fingers. Use your fingers to smooth out any cracks as well. Transfer the dough and parchment paper to a baking sheet and refrigerate while you roll out the red dough.
- Roll the Red Dough: Place a new sheet of parchment paper on your work surface and dust with flour. Place the red disc of dough onto the surface, dust with flour, and roll out into an 8×12.5” rectangle. The red dough will be a little thinner than the white dough, so roll carefully! Sprinkle lightly with a little extra flour and set aside.
- Layer: Remove the white dough from the fridge and return to your work station. Do your best to flip the red dough onto the white dough. It’s difficult to get exact, but the extra flour on the red dough should allow you to move it around some (or use your fingers to move and reshape the dough). Do your best to line all edges up; the red dough should be slightly smaller than the white dough on one long side, but it’s ok if it isn’t. Gently roll the dough once aligned to remove any air bubbles – try not to stretch it any further.
- Roll: Starting from the long white edge with no red on top, begin to roll the dough towards the opposite long edge. I like to use the parchment paper as a sort of sushi mat to allow me to easily pick up and roll the dough, peeling it back as necessary. Do your best to roll up the dough with no air bubbles or gaps.
- Cut & Chill: You should have one long log of dough. Cut the dough in half and do your best to roll it a little to form more of a smooth circle. Optional: spread the sprinkles across a clean work surface (1/4 cup for half of the dough or 1/2 for all of it) and roll the dough logs in the sprinkles until they are evenly coated.
- Chill: Wrap each dough half in plastic wrap and place in the freezer for 1 hour to firm up. (Note: if you want perfect circles, I recommend rotating and reshaping the dough every 15 minutes or so as it will flatten on the bottom side slightly).
- Preheat: Preheat the oven to 350F and line 2 baking sheets with parchment paper (I like to re-use the paper from steps 6 and 7).
- Cut: Remove one log of dough from the freezer and do any final shaping if necessary. Unwrap the dough and use a sharp knife to cut it into 12 cookies; each cookie should be about ½” thick. Transfer the cookies to a baking sheet. If you notice any big gaps between the two layers use your fingers to gently press them together.
- Bake: Bake in the middle rack of the oven for 10 to 11 minutes, until the bottom edges of the cookies are barely golden. Let the cookies sit on the baking sheet for 10 minutes before transferring to a wire rack to cool completely. Repeat steps 13-14 with the remaining dough log.
- Serve & Store: Serve immediately, or store any leftover cookies in an airtight container at room temperature for up to 5 days.
Recipe Video
Recipe Notes
- Make Ahead: Follow the recipe through step 10. Place the cookie dough logs in the fridge instead of the freezer for up to 3 days before proceeding with step 12 of the recipe. Note that the logs will flatten more when stored in the refrigerator, so I recommend rolling them slightly to be more round before you cut the cookies.